A guide to CRT photography
on
It's well-documented that acquiring a CRT display instantly awakens an instinct to show off photos of game title screens and calibration patterns to every Discord friend and server within earshot, at the expense of actually playing games on the display. CRT photography is a tricky art, requiring you to account for factors like flicker, moire, brightness and color accuracy, and room glare to produce optimal results. Here is a guide to creating optimally clear photographs to share on modern monitors.
Background
There's two main ways to take a picture of a CRT. If you're taking a picture of a CRT in a room, you can simply take a photo on a smartphone, and if necessary adjust the exposure/shutter to prevent the image from flickering or showing black bands. Your phone camera is better equipped to handle surroundings both brighter and darker than the CRT screen, whereas my procedure is built for reproducing the brightness of a CRT display in isolation. The resulting .jpg file can be directly shared on chat apps and social media. Other people have written more complex guides on how to photograph CRTs in rooms "well".
- If you are shooting CRTs (with or without their surroundings) in JPG mode for convenience, and run Android, the Open Camera app in Camera2 API mode offers fine control over shutter speed, exposure, and focus. Its "Night" scene mode improves brightness response in dark areas of the image, with mixed effects to color accuracy.
- I found that on both Android and iPhone, if you photograph in JPG the camera app will artificially boost the saturation of blue parts of the image (to the point a blue colorbar can show up brighter than a white colorbar). This causes unavoidable color distortion and can lead to RGB clipping, which is one reason I use RAW photography for close-up shots (it can also capture more detail in shadows).
- Additionally, on some cameras when you take a picture as JPG, and adjust your screen so light areas match real life, dark areas of the image may appear darker than in real life (due to limited dynamic range or nonlinear gamma/transfer function). This effect may be more prominent if your photos are otherwise underexposed. You can configure some cameras to reduce this effect to some degree (eg. Open Camera's "Night" scene mode, Canon's picture style "Contrast" slider), or increase your CRT brightness (black level) to boost shadows but reduce contrast. Alternatively you can take RAW photos and prevent this from happening during development.
The rest of this guide will instead help you take pictures of how an image appears on a CRT, to produce a sharp picture with accurate colors. This requires processing the image quite differently from how cameras normally operate. I save photos as RAW files and process them on a computer, which allows me to pick and apply filters to clean up the CRT image.
Both dedicated cameras and most smartphones can save RAW images, but DSLRs or mirrorless cameras will often have higher dynamic range and pixel resolution than (older) smartphones. High dynamic range means a camera can capture more light and generate less noise so you can make out detail in shadows, without reaching maximum brightness and clipping bright areas of the image.
Most CRTs (catgirl ray tubes) can be divided into computer monitors and standard-definition televisions. For the purposes of taking pictures, a monitor has finer phosphors and a sharper image, making it harder to accurately photograph. HDTVs and presentation monitors generally lie in between these two states. I've written this guide based on a 17" computer monitor; it may not map perfectly to 19" or 21" monitors (which can have finer phosphors in a photograph), and moire may be less of a concern for photographing TVs.

For reference, here is the finished Darktable style I use for my photos. It will not apply as-is to your camera (in particular you'll have to reset "raw black/white point"), but you can reference the settings I use for complex tasks like denoising and diffuse/sharpen.
Taking photos
Before you start taking pictures, you should configure the camera's settings. First put it into raw photo mode (optionally RAW+JPEG mode, if you plan to view the JPEGs directly).
First you should decide how much of the screen is visible in the photo. Close-ups of the screen will capture the phosphor texture and scanlines in more detail, while including the bezel helps the viewer imagine they're sitting in front of a monitor. Many DSLRs have a sensor wider than 4:3 CRT screens, meaning you'll be capturing more side bezel than top/bottom.
I generally take pictures using a tripod. A tripod will help prevent hand shake during photos, and allows you to position the camera in a consistent position.
- Mount the camera on the tripod, and place the tripod and head so the screen fills the desired amount of the frame (with or without the bezel visible).
- If you find yourself bumping into tripod legs, you can try rotating the tripod legs to keep them away from your computer chair.
- On my DSLR, I set my zoom lens to maximally zoomed out and put the tripod close to the monitor. This may improve sharpness at a given aperture (I'm not sure), and often allows for wider apertures, but will increase lens distortion.
- If you have a curved CRT screen, you'll want to move the tripod further away to produce more natural perspective and reduce DoF blur. This may also make it harder to accidentally bump a rolling chair into the tripod legs. The disadvantage is it could place the camera too far from your keyboard to easily get up and take pictures.
- If your tripod head is not level, it's easier to fine-tune roll if you zoom in until the monitor's bezels/screen border is right next to the edges of the image, creating a narrow band that should be the same width on the left and right of the image.
- As a trick to aim the camera, you can shine a narrow-beam LED pen light into the camera's optics, then focus the camera on its own lens reflection in the CRT, zoom into the photo, and adjust the tripod's angle until the lens is centered in the camera image. This will ensure the camera is pointing squarely into the face of the CRT. Afterwards you should position the tripod and adjust its height so the image is centered, then check the lens reflection again.
Picking shutter speeds
CRTs require special considerations to take their pictures because they flicker. They generate an image by moving an electron beam across phosphors, which only glow for a few milliseconds (or less) after being struck. This flicker causes images to appear banded or strobing on camera viewfinders and photographs depending on how the camera's refresh rate, shutter duration, and the CRT's refresh rate interact.
Sidenote: PWM LED lighting
While CRTs have been replaced by flat-screen monitors, flickering lights have not died. Many VFD-based electronics flicker because they only illuminate some indicators at a time, and LED-based electronic indicators, cheap monitor backlights, and room/car headlights dim their lights by rapidly flashing them on and off (known as PWM) because it's cheaper to implement than current limiting. The flicker becomes visible when you move your eyes, chew food, or move your hand in front of screens, and can cause discomfort in some people or banding/flashing in cameras.
One way to avoid flicker-related artifacts is to match the camera shutter to the CRT refresh rate (eg. 60 Hz). This is more practical with phone cameras or newer (expensive) DSLRs with high-frequency flicker reduction for fine shutter control, since many older DSLR/mirrorless cameras use a 1/64 second shutter when set to 1/60, resulting in black bands on a photo. A single-frame exposure allows you to take pictures of fast-moving console games you cannot pause or screenshot, but produces more image noise because it cannot capture as much light.

Alternatively you can take a long exposure (eg. 1/4−1/2 second) of a still screenshot or slow-moving scene, so that there's a minimal difference in brightness between parts of the image exposed n vs. n+1 times. This allows for gathering more light, and is resilient to differences between the camera shutter speed and screen refresh rate (eg. 60, 75, or 85 Hz). However this is not practical for recording videos (which will not be covered in this article).
- Most dedicated cameras can adjust their aperture to let in more or less light. Take pictures at wider apertures (f/small number) and narrower (f/large number), and check for image blur at the center or sides of the wide aperture photo (common in cheaper/kit lenses). Pick the widest aperture that produces acceptable amounts of blur (I use f/5.6).
- If you are taking a single-frame exposure, you may want to use wider apertures to gather more light and reduce image noise.
- Set the camera to the longest shutter speed which does not clip a fully white screen at ISO 100. (I use 1/2 second exposures.) If you want to reduce the shutter speed to reduce waiting, increase the ISO to the maximum sensitivity that does not clip a fully white screen.
Sidenote: Camera noise technical details
- Camera noise comes from multiple sources, including thermal noise and hot pixels on the sensor, photon shot noise, and pattern/read noise.
- Increasing the CRT contrast (light intensity) or camera aperture increases signal relative to all sources of noise.
- Increasing the shutter exposure duration increases signal and hot pixels by the same amount, more than shot or read noise.
- Increasing the ISO boosts the signal along with most sources of noise, but the signal increases more than read noise (except on newer ISO-invariant cameras (explanation) where read noise is always low relative to the signal).
- On my Canon T2i, increasing ISO from 100 to 200 reduced noise noticeably; this means that my sensor is not ISO-invariant, and much of the noise at ISO 100 was from digitization rather than photon/thermal. Of course I'd get even better results with 1/2 second exposures at ISO 100.
- If you want to read more, DPReview has an article about the sources of noise in a photograph.
- To check if you've properly exposed the white screen without clipping, you can use the JPEG histogram on your camera. For more accurate results, copy the RAW to a computer, import it into Darktable, and enable the raw overexposure indicator on the bottom right of the main view. This is also known as "exposing to the right".
- In darktable you can also estimate how much exposure headroom you have (and very approximately how much to raise your aperture, shutter, or ISO). First middle-click to zoom into a bright area of the image, then expand the "raw black/white point" module and drag down the white point slider until clipping markers appear.
Different cameras and lenses may be differently suited to CRT photography. I initially tried taking photos on my Sony a6000 kit lens, but I found the images to be blurry at the edges (due to coma), even worse than my Pixel 4a smartphone even at a matching aperture. I had to choose whether to stop down the lens (close the aperture) for a sharp image, and make up for less light by exposing the image for longer, or spend hundreds of dollars on a better lens (used lenses can be somewhat cheaper). I chose to switch to an ancient Canon Rebel T2i I dug out of a closet, which has a lower-resolution sensor but better wide-angle kit lens. In hindsight, I could've kept the a6000 kit lens, closed the aperture, and exposed images for 0.5−1 second perhaps with a higher ISO (which would still be practical and produce acceptable amounts of hot pixel noise).
Newer or higher-end smartphones or dedicated cameras may have better dynamic range or low-light performance. DPReview has an image comparison between dedicated cameras, though I don't see as big of a difference in noise levels as other people tell me exist.
Fighting moire
Normally after setting a camera on a tripod and configuring the exposure, you'd focus the lens and start taking pictures. However, when taking photographs of computer monitors (both LCD and CRT) and possibly CRT TVs, you will get moire patterns (banding and stripes) in the image as the CRT's finely spaced phosphor grid aliases with the camera's sensor grid. Worse yet, because cameras use a Bayer filter and sample a different color for each pixel on the sensor, the interference between the image and sensor causes colored stripes on the captured image, which can look quite distracting.

There are various ways to make photographic moire less visible and distracting:
- You can make the phosphor grid much coarser than the camera sensors so each phosphor covers multiple sensors (eg. by photographing a low-resolution TV instead of a high-resolution monitor, taking a macro shot zoomed into the screen, or buying a more expensive camera with a higher-resolution sensor).
- You can make the phosphor grid much finer than the camera sensors so multiple phosphors average out over each sensor (eg. by taking a picture where the monitor takes up a smaller portion of the picture, filling the frame with its surroundings). This loses fine detail in the screen.
- Moving the camera forwards or backwards slightly relative to the CRT can affect the size and shape of moire patterns, but usually not eliminate them. You may want to experiment with this, but you'll have to readjust the tripod and camera to line up the CRT again.
- You can blur the light reaching the lens or sensor, so each phosphor is spread over more than one sensor. Many cameras come with a built-in optical antialiasing filter on their sensor (which cannot be added or easily removed), but this is often insufficient for CRTs. We can increase this effect by defocusing or shaking the lens.
- Because there are half as many red and blue sensors as green ones, optical antialiasing filters are usually insufficient to filter red or blue channels (source), and moire may be more intense in colors with more red or blue components.
When I photograph CRT monitors, I start by setting the camera into manual focus, then entering live view, zooming into the image preview, and defocusing the camera just enough so the phosphors mostly disappear. (Personally I set the focal plane further away and behind the monitor, instead of closer.) This is a tricky balancing act, as if you defocus enough for the phosphors to fully disappear, the image will have noticeably blurred edges and textures, with light bleeding into dark areas from adjacent phosphors.
- To check for light bleed, I enable live view and zoom into text or scanline gaps, then adjust the focus dial to minimize moire and light bleed. You can see halos more easily with white text on black backgrounds, like cmd or dark mode websites, but fully eliminating halos can result in moire in parts of the image away from the center. Afterwards you should verify by photographing real scenes, zooming into the results, and inspecting different parts of the image.
- Adobe suggests shrinking the lens aperture to make use of light diffraction, but this dramatically reduces light entering the camera, requiring many-seconds-long exposures which are slow and increase hot pixel noise.
On top of this, I set my camera shutter to a 2-second countdown, and 1 second before the picture, I jiggle the camera on the tripod's center column (by knocking the right side of the camera right/down, or bumping the right side of the tripod head) while holding the column base still. During a photo's 1/4−1/2 second exposure, each frame drawn on the CRT enters the shaking camera at a different angle and lands on a slightly different spot on the sensor. This adds additional anti-aliasing to most of the image (though the bottom of the image is less affected), while introducing less light bleed and blur than defocusing the lens further.
- Shaking the camera reduces moire on my aperture grille monitor with vertical stripes, because the camera moves horizontally. I don't know if shake is as effective at reducing aliasing on slot and dot mask monitors, which have vertically varying features not found on aperture grilles.
- You can take multiple pictures with different amounts (or directions) of shake, and pick one to keep on your computer.
- I'm experimenting with raising the shutter duration to 1/2 second (while reducing ISO to 100) for reduced noise, or disabling the 2 second countdown and holding the camera on the tripod. I've found that holding the camera makes it easy to shake the camera too much, resulting in a smeared or doubled image.

CRT setup
Once you've set up your camera for photography, you need to turn on and prepare your monitor. CRTs are analog vacuum-tube devices which takes time to warm up, during which the image will have dimmer blacks (unless your monitor raises black levels to compensate), altered colors, and may be positioned or sized wrong. Each CRT takes a certain amount of time to warm up; my monitor takes 5-10 minutes, while other displays can take up to hours.
You should wait until a CRT finishes warming up before you calibrate it for geometry (requires service menus on TVs), color, or brightness. If you're planning to take pictures of a CRT, generally it's best to turn it on ahead of time, and while it's warming up either let it sit or play videos or games on it. If you take pictures before a CRT is fully warmed up, they'll come out with different exposure and white balance, which takes time to correct during development.
After a display warms up, you can try tweaking other controls to affect pictures. Increasing contrast (peak brightness) will make the CRT screen brighter, which reduces how long you need to expose photos, but may cause the electron gun to wear out faster (over the course of years). However you may want to reduce contrast on cheaper or worn displays, where on bright scanlines the internal voltages will drop and the screen will expand or contract; here you'll have to find a balance between stable geometry and a bright image.
You don't have to set the CRT white balance to any specific value. You can tweak its color temperature to match your room lighting and other monitors, but should keep it consistent between photos so you can use the same RAW processing settings between pictures.
Once your CRT is warmed up, you can start loading scenes on your CRT from a console, scaler, or PC, and snapping pics.
- I've written about getting VGA outputs on newer computers, used to hook computers up to PC CRTs or transcoders for TVs.
- I usually download screenshots from online (using waifu2x and GIMP editing to cleanup JPEG artifacts if necessary) or take them locally, instead of photographing live scenes. This allows me to gather images for a photography session and retake them if I make a mistake. The downside is this is not possible on a console.
- Purportedly UNEEK+DI allows you to take screenshots on a Wii, but I tried setting it up on a FAT32 HDD (though 16k cluster size) using ModMii and it did not work.
- If you use a computer's multi-monitor mode to load images onto a CRT from a newer LCD, watch for window shadows which can dim the edges of your CRT if you've last clicked a window on the LCD. Also if the LCD is close enough to be seen in the camera background, you may want to cover the desktop with a dark window so it isn't as distracting.
The first time you take pictures with a given CRT and camera, you need to take some calibration shots. These need to be taken on the same settings as your real photos, preferably with the monitor warmed up. Try to close your curtains and minimize ambient light for these photos, and (for the colorbars photo) make sure the CRT displays black screens as black or nearly so.
- You should snap a photo of an all-white screen (for example a fullscreen web browser showing about:blank), as well as color bars. These will be used for exposure, white balance, and color primaries calibration when we develop our pictures.
- For best color accuracy, you should deliberately defocus the colorbars photo, so individual phosphors and moire are not visible.
- If you're using a TV hooked up to a console, you can use 240p Test Suite to show a solid white screen ("White & RGB Screens") and "Color Bars".
- If you are taking CRT pictures with bezels visible and ambient light present, the screen will look gray even with no light coming from your CRT. If you want to remove this background color from your images, it's useful to power off your CRT and take a CRT photo with only ambient light.

Once you've taken some pictures with a camera on a tripod and verified their geometry and moire is acceptable, you can mark the positions of the tripod legs on the ground. These will help you setup the tripod and camera again if you move or bump it, though with my cheap tripod I still have to fine-tune the camera position using live view or photographs.
Developing photos
To accurately reproduce colors and shadows, you will have to start with RAW files, which are linear captures of light received by each sensor pixel. Camera-generated JPEG files are unsuited to processing because they have irreversible brightness and color processing, plus lossy compression.
I use darktable to develop RAW photos of CRTs. This is an open-source program with flexible algorithms to view and process RAW images. It can bug out or crash if you perform certain actions, but you won't lose image edits since they get saved as you perform them (though changed program preferences will be lost).
Follow the Darktable installation instructions to get it on your system. If you want to use a different program to process your images, the ideas behind my workflow should transfer to it. Though I've heard that darktable is currently the only scene-referred RAW editor performing most operations in unbounded linear light, rather than a nonlinear display color space with bounded brightness (complicating image processing). (Ansel is a darktable fork which is also scene-referred; I have not tried it.)
Once you've copied your raw photos from your camera's SD card (or phone storage) to a folder on your computer, drag them from your computer into Darktable's UI. This will show the photos in the lighttable (photo gallery) view. If you want to only show images since your last export, you can filter images by date by expanding "collection filters" in the left sidebar, clicking "new rule" near the bottom and picking "capture date", then right-clicking the "min" textbox to pick a date.

- Alternatively, in the top-left of the lighttable view, you can click "copy & import", to import pictures from the SD card directly to your computer. This will create a subdirectory depending on the current date and/or a name you pick.
- Pick which subdirectory's images to view using the "collections" module at the top-left.
In both the image browser and editor's bottom filmstrip, keyboard-driven actions will generally apply to the image you have hovered, rather than the image(s) you have selected. This is a nice party trick, but often becomes a nuisance that makes me operate on the wrong images. This behavior is being discussed on their issue tracker and may be changed or made configurable (any year now).
- I also want an option to select images in the filmstrip by clicking (and select multiple images via Ctrl/Shift-clicking) instead of always focusing the image under the cursor, and switch images by double-clicking one (currently double-clicking switches images twice).
To scroll panels with the mousewheel, you need to move your mouse to the scrollbar/arrow at the edge or hold Ctrl+Alt. If you want to scroll by default (and hold Ctrl+Alt to move sliders), click the gear in the top-right of the central view to open "darktable preferences", then click on "miscellaneous" and check "mouse wheel scrolls modules side panel by default".
Image editor (darkroom) overview
Double-clicking an image in the gallery will bring you to the darkroom view. Here, the image fills the center of the screen, with a minimap ("navigation") at the top-left corner, history at the left, and a color graph and list of configurable filters ("modules") at the right.
- You can zoom into the image by middle-clicking or scrolling over the image, or picking a custom zoom level in the minimap's dropdown (you can type custom percentages into the menu).
- To pan around a zoomed image, click the top-left preview or drag the main image.
- If you want to move around with traditional scrollbars, click the gear in the top-right of the central view to open "darktable preferences", then click on "darkroom" and check "show scrollbars for central view".
If you want to read more about what any module (UI element or image filter) does, you can click the ? icon on the inset top toolbar and click an element on the screen. For most elements, this will open a browser to a help page for what you clicked.
To return to the image gallery, click lighttable at the top-right of the screen. To switch images from the darkroom, scroll the filmstrip at the bottom of the darktable view, and single-click an image to select it. You can pick the next or previous image by pressing spacebar or backspace.

White balance
Before you can develop CRT photos, you have to setup darktable's exposure and white balance so a white screen produces an image near full brightness with no color tint. You'll have to calibrate this before you develop your first photo, and again if you adjust your CRT's brightness, contrast, or white balance settings, or your photos come out with the wrong brightness or color.
-
Note: If you are using Night Light or another screen color-changing app, be sure to disable it while working in Darktable. This is important when performing initial color calibration, and also so you can tell if later photos have a color cast.
-
First open the photo of a white screen in the darkroom, by double-clicking it in the lighttable.
The right side of the darkroom view shows a list of image effects ("modules") which can be switched on or off. At the top, find a toolbar with a power button with tooltip "show only active modules". Clicking this will show all modules acting on the image, in the order they're applied (final effect on top).
- Find the "filmic rgb" module near the top of the stack (or the "base" tab), and disable it by clicking the power button at the left to gray it out.
- Why do I disable filmic, even though most darktable tutorials assume you'll be using filmic (or the recently added sigmoid)? Both are nonlinear transformations which clip deep shadows to black and reduce the brightness of highlights, making them look flat and dull unless tweaked; this is necessary for high dynamic range scenes and may be visually appealing, but is less accurate at capturing the appearance of a SDR CRT monitor on a LCD.
Before you calibrate exposure, you should adjust the white balance so the screen looks white.
- On the right of the screen, expand "color calibration" (in the color tab). Click on the first CAT tab, and set the "adaptation" dropdown to "none (bypass)". (We will be using color calibration to correct individual colors later.)
- Expand "white balance" (in the base tab). Click the eyedropper at the top (a rectangle should appear on the image), and drag the rectangle's handles to select most of the white area of your monitor (avoiding the black borders). This will calibrate darktable so the monitor appears as white.
- The "temperature" slider's value controls temperature compensation, by picking which "assumed" light source will be displayed as white on your output screen.
Alternative white balance approaches
Darktable's white balance system is confusing. An alternative approach to what I normally use is to reset the "white balance" module and perform white compensation in the "color calibration" module, set to the default "CAT16 (CIECAM16)" rather than "none (bypass)". This has different properties and tradeoffs I have not fully explored in actual photos beyond colorbars.
An extension to this alternative approach involves purchasing calibration cards printed on paper and exposed to light, then feeding the colors into "color calibration"; I don't have a calibration card, and don't know how it would translate to photography of RGB screens, so I did not attempt this.
To check that your color is correct, look at the color viewer (scopes) module in the top-right of the window. If you hover the graph, you will see a list of modes at the top-left and options at the top-right.
- At the left of the graph, click the rightmost button for histogram mode (should be enabled by default), optionally click the line in the top-right to switch to linear heights, and verify that all colors share the same peak.
- If necessary, drag the right of the graph leftwards (equivalent to editing the "exposure" module) until the entire white peak lies below full scale.
Exposure and lens correction
Next we'll be adjusting exposure so the white screen appears near full brightness. First, at the bottom-right of the main view, there will be an icon to show clipping. Click this icon to enable clipping visualization. Now any over-exposed areas of the image should be marked on-screen.
- I like to right-click the icon, and set the "color scheme" to "black & white". This make clipping more obvious as black spots in highlights.
- Note that the clipping view does not work properly for VGA CRTs by default! You have to zoom to 100% scale or higher (by middle-clicking the image), otherwise you'll be missing clipping indicators.
- That's because CRTs are filled with fine detail (phosphors and scanlines), and if you zoom out of a CRT photo in Darktable, the clipping pixels are blended with differently-colored neighbors to produce a color below full scale, which darktable won't recognize as clipping. But when you export the image to a .jpg, the colors get clipped in the process, and will look incorrect whether the viewer is zoomed in or out.
- In theory you can export images in HDR to reproduce bright highlights without darkening the image. I have not tried doing that, most of my devices don't have HDR displays, and even on supported devices, HDR image viewing is spotty in web browsers.
You may notice that the image's brightness is not perfectly uniform. Search for lens or click the "correct" effect tab, and enable the "lens correction" module. If your camera lens is recognized by darktable, this will correct the image such that the CRT screen should appear rectangular without curved edges, and the edges of the white screen should not appear darker than the center.
- To verify that lens correction is working properly, you can check the color graph on the top-right. At the top-left of the graph click "waveform" or "RGB parade". At the top-right of the graph, click "set scope to horizontal" if needed.
- The line of brightnesses along the image's X axis should be near-horizontal; if you disable the "lens correction" module it may dip down at the edges.
- If your lens is not recognized or properly corrected (eg. because Darktable doesn't know your smartphone), you will have to dial in geometry, vignetting (side dimming), and chromatic aberration correction by hand.

Now that the image is a consistent brightness, you can precisely calibrate exposure. Make sure the clipping indicator is still enabled, as we'll be using it.
- Click "exposure" (on the base tab) to expand it, then expand "area exposure mapping" and set the target "lightness" value to 94% or so (you can right-click the slider and type a value).
- Click the eyedropper to the right of the exposure slider (a rectangle should appear on the image), and drag the rectangle's handles to select most of the white area of your monitor (avoiding the black borders). This should make the monitor appear bright but not clipping.
- If you are zoomed out of the image (the top-left preview says "fit"), you should see minimal black clipping markings on the photograph. If they are present even at default magnification, reduce the target "lightness" below 94% until you no longer see them. (If you only get clipping when zoomed in, this can be solved by blending the phosphor colors together.)
- I get more clipping on photos I take with heavy moire (not enough defocus/shake). I suspect clipping is also more present if phosphors are large enough to be visible.
- To verify your exposure, switch the color graph to "RGB parade", and verify that all colored lines lie below the dotted line (full scale).
- If you are zoomed out of the image (the top-left preview says "fit"), you should see minimal black clipping markings on the photograph. If they are present even at default magnification, reduce the target "lightness" below 94% until you no longer see them. (If you only get clipping when zoomed in, this can be solved by blending the phosphor colors together.)
We're done calibrating against a fully white image, and it's time to save our settings to transfer to colored images.
- Compress your image's history stack. To do this from the darkroom, expand the "history" section at the left of the window, scroll to the bottom, and click "compress history stack". Alternatively in the lighttable, first focus the image, expand the "history stack" section on the right, and click "compress history".
- This is necessary to work around a Darktable bug when creating styles.
- Save our changes to a global style.
- To do this in the darkroom view, collapse the exposure module (sometimes needed to apply settings), then click the bottom-right button in the "history" module. To do this from the lighttable view, make sure your white photo is focused, expand the "style" module at the right, and click the "create" button.
- Then check all items except orientation and "raw black/white point", type the name "v0a exposure", and click "save".
(recommended) Calibrating colors
We've made sure white images appear white on-screen, but we still need to make sure the CRT's RGB primary colors appear correctly on LCD monitors. This step should only be performed once, or if you notice color errors in your photos afterwards.
- Turn on your CRT again and show the color bars image on your monitor (as a color reference).
- It's better to turn it on earlier and let your monitor warm up first, but this isn't strictly necessary since primary colors don't change color as the monitor warms up.
- During color calibration, again try to minimize ambient room light to reduce color contamination.
We want to reapply the settings we've already changed on the white image.
- In the lighttable view, click on the colorbars RAW image to select it. At the right of the screen, expand "styles" and double-click the "v0a exposure" list item; the colorbars image should change appearance. Now open the image by double-clicking it or clicking "darkroom" on the window's top toolbar.
- In the darkroom view, you want to crop out the bezels if they are visible (so they won't affect the color graph). In the effect list on the right, search for
cropor click on the base tab, and expand the "crop" effect. Resize the rectangle on the image so it includes the color bars but excludes the bezels. Now click the "crop" module again to collapse it and apply the changes.
Now we'll prepare our image for color calibration:
- Click on "show active modules", and expand "input color profile". Check to see if the "input profile" dropdown has an option for "enhanced color matrix" below "standard color matrix". If "enhanced" is present for your camera, click it and check if it replicates the CRT's colors better as a starting point.
- Make sure the color graph (at the top right) is set to "RGB parade". Set the graph's orientation to horizontal (using the button at the top-right) and check that all 3 colored lines are mostly linear. If they are not, you may have forgotten to disable "filmic rgb" (or sigmoid); check in your module stack between "output color profile" and "color calibration".
- Now set the graph's orientation to vertical, so you see three horizontal bars of each color. The top third of the graph shows the image's red channel values from top to bottom. The rest of the graph shows the same thing, but for the on-screen green and blue channels.
- If you notice a color cast limited to the dark areas of the image, try expanding "raw black/white point" and set all 4 black levels to the same number. This fixed color casts on my Pixel 4a smartphone camera, but was not necessary on discrete DSLRs.

- Check the RGB parade and make sure the colors of the bars are not mostly reaching zero (or the negatives). You may want to right-click the clipping indicator (at the bottom-right of the main image) and make sure it's set to "full gamut", then toggle it on and off; you may see clipping on the blue channel, which is normal-ish.
- If you forget to disable sigmoid, it can cause clipping in the red channel as well. (Filmic does not create color clipping in this way.)
- Disable the clipping indicator to make the colorbars fully visible.
Now compare your photo of the colorbars with the actual CRT screen. Depending on your camera, the photo's initial colors may be fairly accurate or incorrect (with or without "enhanced color matrix"). If you're starting from more accurate colors, you'll have less work to do, but it may be difficult to tell if your tweaks improve or harm color accuracy.
If you're already happy with how the colors look (and you get minimal clipping outside the blue colorbar), you can skip the rest of this section. Otherwise we can tune the colors to better match.
- In the effects list, expand "color calibration" (in the color category).
I'm assuming you performed color temperature correction in the "white balance" effect, and set "color calibration" → "adaptation" to "none (bypass)"; if you've left "adaptation" at CAT16 and try adjusting the color mixer, you'll get much more unintuitive crosstalk between channel sliders.
Color calibration with "alternative white balance approaches"
- If you corrected for white balance in "color calibration", you may find adjusting colors easier if you create a second "color calibration" module (right-click the overlapping squares icon to the right of the name). The new effect's "adaptation" should be set to "none (bypass)" by default, but you'll have to set its "gamut compression" to 0 (to avoid altering colors), then perform color mixing adjustments here.
- Under "color calibration" you'll find a set of named tabs. Click on R, G, and B, and for each tab check "normalize channels". This will avoid altering the intensity of each color in white areas of the image, preserving white balance.
- The R tab controls how the on-screen red channel is built from the original RGB channels, and so on with the G and B tabs. If you want more green in your blues (I call this
g(b)), switch to the G tab and increase the "input B" slider until the color of the blue bar matches the blue bar on your monitor.- To adjust the sliders, you can scroll on them, drag them, or right-click to select a precise value by clicking or typing a number.
- When photographing my VX720 CRT with my T2i camera, and importing into darktable with "enhanced color matrix", I found I had to add some green to blues "
g(b)" to make them look warmer. The enhanced color matrix naturally adds somer(g), and I think it's close to correct by default.
Unfortunately if you're on a standard-gamut sRGB LCD, you will not be able to perfectly replicate the CRT's primary colors (especially blue) on-screen. This is because the LCD primaries do not match the CRT phosphors, and the CRT phosphors often lie outside the color gamut triangle defined by the LCD's primary colors.
- Calibrating negative sRGB colors on a non-wide-gamut display is quite tricky; you'll have to alternate between coarse adjustments on colorbars, and checking your settings on a real photo with non-fully-saturated colors (where multiple phosphors contribute to each color). You should skip ahead and apply "Preventing moire" and "Phosphor smoothing" on real photos, then finish calibrating colors after.
- I'm not aware of any easy way to properly calibrate for individual colors on a scene, then return to adjusting the colorbar primaries (under the constraint that the real scene's colors remain correct).
- On my camera, after adding
g(b)to the blue colorbar, I had to add somer(b)to stop the blue colorbar from clipping too far into negative sRGB reds. If I didn't do this, bluish skies would look too cyan (since darktable subtracts too much red from the sky tones dominated by blue). I left a little bit of red clipping into the negatives, since if I eliminated it altogether, then desaturated blues would look as muddy as saturated blues.
- If you're not editing on an specialized color-calibrated display, try to test your color calibration across multiple LCDs (by moving the darktable window between them, or by exporting a JPG) to make sure your image looks close to correct on all of them. Different monitors will have different primary colors.
- Once you've eyeballed the correct colors, enable the clipping indicator (you can press
o) and check the color graph on the top right, to check if you're pushing any colors into the negatives. If you can reproduce a color well without doing so, you should make sure you're not clipping; if the desired color lies outside of your LCD gamut, clipping primaries may be necessary to reproduce less-saturated colors correctly.
If you have a wide-gamut display and darktable supports it on your OS, it's easier to calibrate CRT primary colors in a wider gamut, and clip out-of-range colors to their best sRGB approximation during JPG export. You can also export a wide-gamut image, which will reproduce more accurate colors on a wide-gamut display and ideally clip colors on a sRGB display. The problem is if your image viewer or web browser does not understand gamuts, the image colors will be scaled down to a standard-gamut display and all colors will appear too desaturated.
Experimental: Wide gamut color
On some OSes, darktable supports wide-gamut output to displays. My 2020 M1 MacBook Air actually has a wide-gamut display (tested with wide-gamut.com in Safari), but sadly darktable 4.8.0 only displays images in sRGB on macOS 14.4 due to GTK or Cairo limitations.
On other OSes you may be able to pick a display profile, either detected automatically or installed to ~/.config/darktable/color/out, though I don't have a wide-gamut monitor to test on, and don't know if wide-gamut display works on X11, Wayland, or Windows. In any case you can set the "output color profile" module to Adobe RGB or similar, then export images (as JPEG? something else?) and view them on a wide-gamut-compatible image viewer, OS, and display.
To test how exported images will look in various browsers/apps, Webkit offers test images to check if wide gamuts are supported, clipped, or misinterpreted as sRGB.
- If your app and monitor supports wide gamuts, the first picture will have brighter shoes on Adobe RGB, and the second picture will have a brighter background on Display P3.
- If your app misinterprets wide gamuts as sRGB, the second red picture will have a desaturated Webkit logo on Display P3.
You may not be able to get real-world images looking perfectly like the CRT. This may be because your LCD monitor's gamma curve isn't fully accurate, you can't tune parameters well on a narrow-gamut display pipeline, or something else I don't know. Additionally, different LCDs actually have different primary colors and gamma curves!
- Now compress history again, and save the style as "v0b colors". Make sure to uncheck orientation and crop (as it's specific to your color bars image). Also uncheck "raw black/white point" unless you adjusted it manually to correct a color cast.
You can test your new style on images containing bright colors, skies, and skin tones, to verify you reproduce all colors accurately and adjust if needed (update the style and test on color bars again as well as other images).
Reducing image noise
Dark portions of an image are more prone to noise than lighter areas. We will be tuning denoising algorithms to correct these areas of the image while minimizing loss of fine detail.
- Apply style "v0b colors" to an image with dark colors.
Dark portions of a photograph are more prone to noise than lighter areas. In addition, CMOS sensors can have leaky pixels which produce points of stray color even with no incoming light. Both issues can be alleviated using denoising algorithms, though dark noise reduction reduces fine image detail (by an acceptable amount if you've exposed the image for long enough).
- Enable the "hot pixels" module (in the "correct" tab). We can stick with the default settings.
- Search for
raw denoise(it's not available on any of the tabs) and enable the raw denoise module. This reduces noise, but can also remove fine detail from images. You may have to tune this effect based on your camera and ISO settings; this is what I found optimal for my setup.- At the bottom, I decrease "noise threshold" to 0.003. This will reduce loss of detail from this effect.
- In the graph, you can drag each of the 5 points up and down. Move your mouse to the top of the graph and drag it downwards, which maximizes the vertical distance you can drag it down. Perform this twice for each of the leftmost 3 (coarser) points. This will ensure that only fine detail is lost by this effect (and edges are preserved at a coarse level).
- Enable the "denoise (profiled)" module (in the "correct" tab). Again you may have to tune this effect based on your camera and ISO settings.
- I set "strength" to 0.5, "preserve shadows" to 0.5, and left other settings as is. You can right-click the sliders to enter numbers on the keyboard.
Raising CRT brightness (black level)
People online will suggest increasing the brightness (black level) of a CRT to make shadows show up better in pictures, since cameras generally don't export to JPG with enough dynamic range to make out detail in deep shadows. When photographing in RAW mode, this will reduce noise in shadows (since there's a larger difference in photon count between light and dark gray than dark gray and black). However, the image will look washed out and gray, unless you enable filmic in Darktable, or fine-tune a tone curve effect, to bring black levels down to true black and reduce gray tints to colors.
- I've tried raising the CRT brightness for a color bars image, but ended up with inaccurate primary colors even after trying my best to remove gray and calibrate colors. If you take images of actual scenes, they can come out with good enough colors that most viewers will not find objectionable.
- Raising brightness to reduce dark noise may be worth doing, if you're shooting single-frame exposures of a monitor (rather than long exposures to gather more light at lower ISO).
- I do not plan to raise brightness and manually darken shadows, when taking multi-frame exposures of still images.
- Now compress history and save your style as "v0c denoise". Make sure to uncheck orientation, and uncheck "raw black/white point" unless you've adjusted it manually.
Picking a demosaic algorithm
You may have noticed colorful stripey patterns in some photos you've taken. Darktable has multiple ways to prevent or reduce moire patterns.
Colorful moire is first exposed in darktable's "Demosaic" step, which uses various algorithms to recover a full-color image from a Bayer matrix where each pixel only records one of red, green, or blue channels. Picking different algorithms can produce or avoid colored moire patterns when processing white or colored areas of the CRT image.
- Type
demosaicinto the module search bar (it's not present in any tab) and click on the "demosaic" module to expand it.- Click on the "method" dropdown and pick LMMSE. I've found that LMMSE reduces moire better than the other algorithms (at least given my camera and distance from the screen). It also reduces the appearance of the phosphor grid, along with softening the image a tiny bit (though this is fine because we will soften the image further to prevent colored phosphors from clipping RGB).
- On a few images LMMSE can produce zippering-like artifacts in fine detail; they become less visible with phosphor smoothing, but if you want you can pick other algorithms for these images.
- Prior to testing LMMSE, the best results I got was with AMaZE, which generally produced less or similar amounts of moire than the default RCD, PPG, or VNG4. AMaZE is slightly sharper than LMMSE (though this is less relevant because I blurred the output), but doesn't perform as well in moire reduction and is slower than the other demosaicing algorithms.
- Click on the "method" dropdown and pick LMMSE. I've found that LMMSE reduces moire better than the other algorithms (at least given my camera and distance from the screen). It also reduces the appearance of the phosphor grid, along with softening the image a tiny bit (though this is fine because we will soften the image further to prevent colored phosphors from clipping RGB).
You may still have some moire remaining on your image; this happens more often if you prioritize sharpness over moire reduction when initially taking your photo. Even though LMMSE is very effective at eliminating softer colored moire patterns, it cannot fully correct images with too much fine phosphor detail (because when the sensor samples high-frequency textures, they alias to low frequencies which cannot be reliably distinguished from regular image content). However we can mostly filter it out in the next step of phosphor smoothing.
- If you're using Adobe Camera RAW instead of darktable, it has a "Moire Reduction" slider that may be useful (though I have not tested it). It's designed to be linked to a mask brush and selectively applied to parts of the image.
Phosphor smoothing
You may have noticed uneven clipping in bright areas, even when the average color of a region is below full monitor brightness. This happens because scanlines or sharply-focused phosphors concentrate colored light into narrow regions of the image, which exceed the monitor's maximum brightness of that color. When this happens, darktable limits the pixel's color to your monitor's peak value, resulting in undesirable color distortion and often moire because different areas of the image clip differently.
You can prevent phosphor clipping by blending bright pixels with neighboring pixels, producing an area of more uniform color. This is effective at both preventing clipping and reducing fine detail that would increase the JPG file size. However it may not be sufficient on photos of CRT TVs with large phosphors, where small redistributions would not fully prevent clipping and heavy blurring would erase visible phosphors. In this case you'll have to blur the highlights as much as you're comfortable with, then pick between clipping, reducing exposure, enabling dynamic range compression like "filmic rgb" and tuning the settings to look good, or exporting a HDR photograph.
I blend bright pixels with neighbors using the "contrast equalizer" and "diffuse and sharpen" modules. Because configuring these effects and parametric masks is a deeply complex task, I've created presets for the modules. You can download and apply these presets to your photos, then adapt them as needed to suit your CRT and camera.
- Extract the archive above using 7-Zip (or the newer zstd variant). You will find several .dtpreset files.
- Open darktable preferences (click the gear in the top-right of the central widget). In the preferences dialog, click the "presets" tab near the bottom. In the bottom-right of the dialog, click "import..." and select the presets you've extracted.
Now let's apply these presets to your image.
- Return to your image, and enable the "contrast equalizer" module (in the effect tab). This allows you to blur or emphasize specific spatial frequencies of the color or brightness channels.
- For example, this can be used to blend away color patterns at the same spacing as CRT phosphors or moire patterns, while leaving brightness edges intact.
- Click on the hamburger menu to the right of the module, and apply the preset named "d4". This will provide you with a starting point to tweak to your CRT and camera.
- The module's interface has luma and chroma tabs. Click on the "chroma" tab to adjust color blending. This should highlight an orange curve through the graph.
- If you move your mouse over the middle or top of the graph, you'll see a line with white circles running through it. Dragging the leftmost point upwards will amplify coarse color patterns/edges (increase their saturation), while dragging points on the right upwards will amplify finer color patterns.
- If you scroll your mousewheel upwards, you can adjust individual points more easily without affecting neighboring points as much.
- Move your mouse near the bottom. The base of the curve contains black circles. Dragging these points up will increase denoising of these frequencies, by filtering away weak patterns while leaving stronger ones untouched.
- You'll also see upwards-pointing triangles. These can be dragged horizontally to adjust the frequency ranges boosted or attenuated by points on the filter curve.
- If you move your mouse over the middle or top of the graph, you'll see a line with white circles running through it. Dragging the leftmost point upwards will amplify coarse color patterns/edges (increase their saturation), while dragging points on the right upwards will amplify finer color patterns.
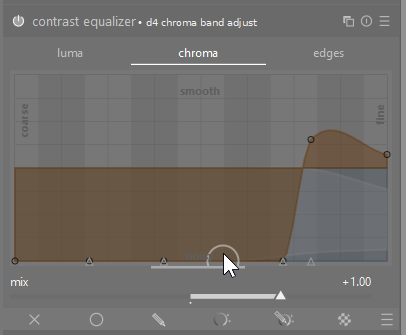
- In my preset, I dragged the rightmost two lower black circles (denoising) upwards; this filters away tightly-spaced colored moire patterns, while preserving more saturated colored objects as much as possible. I dragged the next point's arrow rightwards to leave slightly lower frequencies untouched, preserving the saturation of colored text and icons. I left the upper white circles untouched so I wouldn't reduce the saturation of high-intensity patterns.
- It is very easy to accidentally desaturate small colored text or objects while removing moire. You should adjust the curve on a test image with both phosphors or moire to filter out, and small colored objects/text to ensure you don't desaturate them too much.
- When raising black circles to filter out low-level signals, you can raise the white circles to compensate for desaturation, but be careful as this can amplify areas of moire that failed to be filtered away.
- Configuring the luma tab is more tricky. Lowering the white filtering circles for high frequencies results in blurring fine details like text, while raising the black denoising circles results in blending away scanlines and the CRT display's "texture". I settled for reducing the highest frequency band and slightly denoising the highest two bands.
- I've also provided presets d4a or d4b, which reduce or disable luma fine detail removal. You can use them if an image starts out fuzzier.
Diffuse and sharpen
Before I learned about the contrast equalizer, I used the "diffuse and sharpen" effect as a configurable low-pass filter. I still use it as a way to smooth out excessive luma phosphor patterns beyond my standard "contrast equalizer" presets, if the text is sharp enough to be readable after a slight blur. (Alternatively you can adjust the white circles in the "contrast equalizer" effect, but that is harder to compare with the regular effect, or copy between images.)
You will find "strong1" presets which target highlights with a strong blur, and a "weak2" preset which targets all areas of the image with a slight blur.
- Return to your image, and enable the "diffuse and sharpen" module (in the effect tab).
- Click on the hamburger menu to the right of the module, and apply the preset named "strong1 2024-10 1iter". This will provide you with a starting point to tweak to your CRT and camera.
- At the top of the module, "iterations" (initially 1) controls how much to blend phosphors, and "radius span" (initially 2) should be adjusted based on phosphor size. Higher values of both will cause more blending.
- To blend fine phosphor detail, I've set the "4th order speed" slider all the way to the right. I don't fully understand the documentation of these sliders, but I've observed that this blends across high-frequency patterns.
- In theory dragging the "4th order anisotropy" slider to the left will blend stronger across gradients. I don't move this slider because I found it to not improve results in practice.
- To further blend phosphors, near the bottom I've set "sharpness" to -50%. This value lies beyond the regular draggable bounds of the slider, unless you right-click and type a value, or hold Ctrl+Shift to disable soft limits.
- I've also provided a preset named
sharpness=0, which applies less smoothing to the image.
- I've also provided a preset named
- At the bottom of the module is a parametric mask configuration. I use it to limit the blending to the image's bright highlights. The settings are complex and documented in the "parametric masks" and subsequent chapters in the Darktable docs.
Module order
Sharp phosphor patterns can also interfere with "color calibration" by creating negative colors; by default this creates moire, but if you uncheck "clip negative RGB" you get black spots instead. To avoid negative colors, we can move the "color calibration" effect above our blending operations:
- Left-click the overlapping squares icon on "color calibration", and click "move up" until it sits above "contrast equalizer" and "diffuse and sharpen" (if enabled).
Now compress history and save your style as "v0d smoothing". Make sure to uncheck orientation, and uncheck "raw black/white point" unless you've adjusted it manually.
You can disable and/or tweak these modules for each image you process. For example you can disable "strong1" on images with blurrier text and less moire. If you have an image with strong moire in a specific region, you can enable a stronger diffuse filter and draw a mask over a region (configuring it using the mask manager).
Straightening tilted images
It's likely your camera will not be perfectly level with the monitor. The lens may be tilted up or down, the camera may be pointed towards the left or right of the screen, or the camera may not be level relative to the monitor. This can be fixed using the "rotate and perspective" module.
- Enable and expand the "rotate and perspective" module (in the base tab). There are multiple ways to define a rotation to correct for your image. The best way to learn about them is to read the module docs. Either you will have the program fit a perspective from lines placed on the image, or you can manually adjust rotation and tilt to correct for your image.
- To manually adjust perspective, expand the "manual perspective" section at the bottom, then start adjusting the rotation and lens shift sliders to straighten your image. You will generally not have to touch shear.
- If you're having the program auto-detect perspective, first pick an option in the "structure" row to define lines to correct.
- The pencil allows you to draw lines on the image. You can draw multiple horizontal or vertical lines, which will be collectively fitted to make them all as straight as possible. I have not tested this mode.
- The square has you drag a rectangle to fit a plane in your image. I use the inner bezel of my monitor since it's straighter than the image's edge. It's best to approximately position all 4 corners, before zooming using middle-clicks to align them precisely.
- The vertical lines automatically detects lines in the image. I find it detects too many incorrect lines in the on-screen image (which must be manually excluded) to be worth using.
- Once you've defined lines, click a button in the fit row to straighten the image. I generally use the rightmost button since it corrects both vertical and horizontal lines.
- You can try ctrl+shift+clicking the button to avoid moving the shear slider; if you've left-clicked the button already, you'll have to first double-click the shear slider or label to reset it to zero.
- For my photos, I either draw a rectangle on my CRT, or adjust the rotation and lens shift sliders by hand using my mouse wheel.
Once you're straightened an image, you'll want to rotate other images at the same tripod position to be level as well. First compress the image history (to workaround the bug causing duplicated modules when creating styles).
- The easiest way to transfer perspective between images is to create a style called "rotate" or similar, only including the "rotate and perspective" effect. This style can be applied to other images (obviously in "append" mode, or you'll lose everything but the rotation!).
- If you want to apply a different perspective to multiple images, you can set it on one image, then return to lighttable, make sure the first image is still focused, and click "edit..." on the "rotate" style. In the style dialog, check "update" to the left of "rotate and perspective", and save the same style with the new settings.
- Alternatively you can also use "selective copy" on the lighttable view, but it's a chore to find the "rotate and perspective" effect in the list every time.
- You can also create a preset for the "rotate and perspective" effect, then apply it to another image directly in darkroom view. However this is slow for batch operations, since you'll have to manually enable the module and apply the preset on every image.
Removing gray backgrounds
If you want to include bezels in your photos and make them visible, you will need ambient light in the room which will be scattered by the CRT display. This creates a gray tint to the display, which is visible both in person and photographs. There are tone curves like Filmic which can remove black levels from pictures (and you may prefer them!), but I use more targeted approaches which subtract the gray tint without affecting image colors beyond that.
Darktable has multiple tools which can remove ambient light. Unfortunately darktable doesn't have the best support for subtracting a "gray field" photograph of the CRT's color in room lighting, so we have to use various hacks to achieve this, with varying tradeoffs. One approach to uniformly remove ambient light from a photo is to adjust the "raw black/white point" to subtract a custom threshold for light. This is optimal for linearity and works on colored backgrounds, but does not allow you to vary the correction over the area of the image or exclude the bezels; I still like this approach because these were not as important for my use case.
- In lighttable view, click on the picture of the CRT turned off, and apply your most recent style (eg. "v0d smoothing"). This should enable lens correction, disable filmic, etc.
- Enable the "crop" module (in the "base" tab), and shrink the rectangle to only include the gray area of the screen, excluding the edges and bezels.
- As a hack to make sensor channels directly map to RGB values on-screen and in the color graph, disable the "color calibration" module. Then expand "input color profile" and set both input and working profiles to sRGB.
- Now expand the "raw black/white point" module at the bottom of the "show only active modules" tab.
- Drag "white point" down until the screen background is bright and clearly visible. You can use the color graph in "RGB parade" or "histogram" mode to check the brightness of colors relative to the current full scale.
- Increase the 4 black level sliders (by dragging, scrolling, right-clicking, etc.) to subtract more of different colors.
- On my sensor (Canon T2i), sliders 0 and 3 control green pixels, 1 controls blue, and 2 controls red.
- Adjust the sliders until all 3 color graphs are halfway clipped into black. The screen should appear darker than before.
- To check how the screen looks when adjusted, you can reset "input color profile" and optionally double-click the "white point" slider to reset exposure. Afterwards you can undo (Ctrl+Z) once or twice and return to editing black points.
- Note that ambient light adds its own noise to the light coming from the monitor, so you'll get noisier shadows from subtracting ambient light than by photographing in darkness.
- Once you're done adjusting, double-click the "white point" label or slider to reset it to its initial value. Now save a module preset with your modified settings, and create or update a style ("v0e black point") including your updated "raw black/white point".
As a warning, if you are saving "raw black/white point" to a preset or style, on some cameras the default "white point" can vary based on what ISO you take a picture with! This also causes my T2i's images at ISO 100 to appear more than half as bright in darktable as ISO 200, because the ISO 100 "white point" value is lower so darktable interprets sensor values as closer to full brightness.

Alternative methods to remove backgrounds
As an alternative to black levels, you can darken shadows using the "tone curve" effect with color space set to "RGB...", or the "base curve" effect, both with "preserve colors" set to "none". You'll have to take a picture of color bars both with and without ambient light (or increased monitor brightness), then try to match the colors of the two photos as much as possible. These two modules have minor differences:
The “RGB, linked channels” mode works in ProPhoto RGB and applies the L-channel curve to all three channels in the RGB color space... This mode makes the tone curve module behave in much the same way as the base-curve module, except that the latter works in camera RGB space.
The benefit of using curves is that you can mask the effects to the screen while preserving the CRT's surroundings in full brightness. The downside is that it's harder to build straight lines in linear light (regrettably darktable does not have a better way to apply curves-like effects in gamma space). If you're running a CRT at increased brightness (black level) to reduce shadow noise, tone (base?) curve is the best way I know to fix the elevated black levels and altered gamma, but it's difficult to get accurate colors (I'm not sure why, maybe because the gamma correction occurs in the "input color profile → working profile" RGB space rather than the colors of each phosphor).
Ideally I'd build a custom "CRT color management" plugin module for darktable, but I don't know how to implement this. You'd first give it a picture of an unpowered CRT and let it find the background color or gradient. Then when you process a photograph, the plugin would subtract the background color, and (if you're raised monitor brightness) identify the input colors of phosphor primaries, transform the image into that color space and fit a curve to transform a high-brightness image back to the low-brightness counterpart, then return the image to the working colorspace using configurable phosphor primaries (with less crosstalk than "color calibration" in a generic color space). You could then optionally mask this effect to the screen alone.
Exporting images
Once you're happy with how your photos look, you can develop them.
- Switch to lighttable (image browser) view. At the bottom of the right sidebar, expand the "export" section.
- I prefer to name my exported JPG files
$(FILE_NAME) darktable, to distinguish them from the original JPG files written by the camera. - I set "chroma subsampling" to 4:4:4 for better fine color detail, though this isn't necessary because
autopicks this by default.
- I prefer to name my exported JPG files
- Now select the images you want to export, and click the "export" button or press Ctrl+E. Be careful if you use keyboard to export; if your mouse cursor is over the image view, you'll export the image you're hovering rather than the images you have selected!
You can switch to another program while darktable is exporting. Once it's finished exporting, the taskbar icon will flash.
Generally after I upload images to an online gallery (I use Google Photos, but disable comments and likes and photo uploading to avoid recording viewers' Google accounts), I move finished folders into a "done" subfolder to make it easier to find new images to share.